Note
Access to this page requires authorization. You can try signing in or changing directories.
Access to this page requires authorization. You can try changing directories.
Azure DevOps Services | Azure DevOps Server | Azure DevOps Server 2022
Visual Studio 2022 | Visual Studio 2019 | Visual Studio 2017 | Visual Studio 2015
Use work item templates to quickly create work items with predefined field values and apply consistent updates across multiple items. This article explains how to add and manage templates in the web portal and, for legacy environments, in Visual Studio 2015 or earlier. For examples, see Sample work item templates.
Use the web portal for the current Azure DevOps experience. Use Visual Studio 2015 with Power Tools only when your environment still depends on Team Explorer-based template management.
Work item templates are different from process templates. For more information, see About processes and process templates and the default process template articles for Basic, Agile, Scrum, and Capability Maturity Model Integration (CMMI).
Choose your workflow
Use this table to choose the right workflow.
| If you want to... | Use... | Why |
|---|---|---|
| Capture, manage, and apply templates in the current experience | Web portal (primary) | Team-scoped templates are managed in Azure DevOps. |
| Reuse centrally managed defaults for a team and work item type | Saved templates | Templates are discoverable and reusable by team members. |
| Share a quick link that opens a new work item with predefined values | Template URLs | Best for lightweight sharing in dashboards, wikis, or messages. |
| Continue a Team Explorer-based legacy workflow | Visual Studio 2015 with Power Tools (legacy) | Applies only when your environment still depends on legacy tooling. |
Prerequisites
| Prerequisite | Description |
|---|---|
| Web portal workflow (primary) | - Access to an Azure DevOps organization and project. - To manage templates, be a member of the team that owns the templates. - To use templates, have Contributor access to the project. - Use a supported browser and open Azure DevOps in the web portal. |
| Visual Studio 2015 workflow (legacy) | - Use this workflow only when your environment still depends on Team Explorer template management. - Install Microsoft Visual Studio Team Foundation Server 2015 Power Tools. - Templates captured in this workflow are user-scoped and appear only in Team Explorer. |
Restrictions for using templates
Templates defined in the web portal are separate from templates defined in Visual Studio.
| Template type | Scope | Where you can manage and apply it |
|---|---|---|
| Web portal template | Team-scoped | Web portal only |
| Visual Studio template | User-scoped | Visual Studio only |
You can use the URL from either template type to add work items through the web portal.
Supported template tasks
The availability of template tasks depends on your client and platform configuration. Use the web portal for the primary Azure DevOps workflow. Use Visual Studio 2015 with Power Tools only for legacy scenarios.
The following table summarizes task availability in the web portal and in the legacy Visual Studio workflow.
| Template task | Web portal | Visual Studio |
|---|---|---|
| Capture a work item as a template | ✔️ | ✔️ |
| Manage work item templates (Define, edit, delete, copy link, create copy, and rename) |
✔️ | ✔️ |
| Copy the link (URL) of a template | ✔️ | ✔️ |
| Add a work item by using a template | ✔️ | ✔️ |
| Define a work item template | ✔️ | ✔️ |
| Apply a template to one or more work items | ✔️ | ✔️ |
| Add or remove tags from templates | ✔️ | |
| Define a template with a hyperlink | ✔️ |
Capture a work item as a template
Use the procedure that matches your client: web portal (primary) or Visual Studio 2015 and earlier (legacy).
Each template you capture in the web portal gets a unique GUID. Use the following steps to capture a work item as a template and copy its link.
In the web portal, open the work item you want to use as the template source.
At the right, select
 More actions > Templates > Capture:
In Capture Template, configure required and optional fields:
Team (required): Select the team to associate with the template.
Name (required): Enter a template name.
Fields: Use
 Add to include fields,
  Delete to remove fields, and set field Value as needed.
Notes: Add template context. When you create a work item from the template, this text appears as the first entry in the Discussion thread.

Select Save, and then select Copy link to copy the template URL.
Use the URL to create work items of the same type with predefined values. For common sharing scenarios, see Create a work item from a template URL and Add a template link to a team dashboard.
Verify the template appears in the selected team's template list for that work item type, and the copied link opens a new work item form with predefined values.


Manage work item templates
For each work item type, you can view and manage templates defined by your team. You can add, edit, copy, delete, rename, and copy a template link.
Use these steps to open work item templates in the web portal:
In the web portal, open Project settings.
Under Boards, select Team configuration.
If you need a different team, use the Team selector in the breadcrumb trail.
On the Boards page, select Templates:
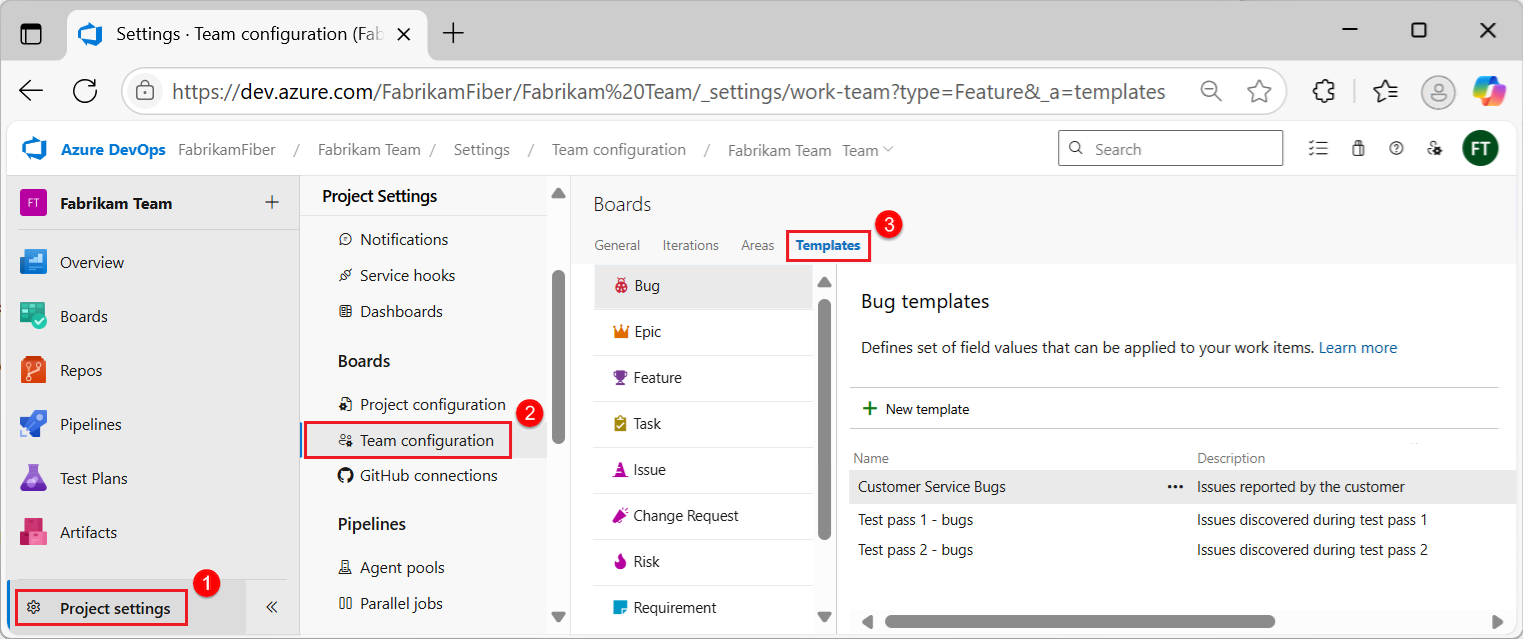
Select a work item type, such as Bug, Feature, or Test Case, to view or add templates for that type:


Create a work item template
Use these steps to create a work item template in the web portal:
On the work item type page, select
New template:
Note
If you plan to use markdown in a large text field, add
<br>tags to manage line breaks and ensure the markdown renders correctly.In the New Template dialog, enter a Name (required), and then add any optional fields and values.
Select Save. The Copy link option becomes available.
Select Copy link to copy the template URL.
Verify the template is listed for the selected work item type and that the copied link opens a new work item form with template values.
Edit, delete, copy link, or create copy
After you save a template, you can update it, remove it, copy its link, or create a copy.
On the work item type page, select ![]() More actions for a template, and then choose one of these options:
More actions for a template, and then choose one of these options:

Edit: Select Edit, update the template, and then select Save.
Delete: Select Delete, and then confirm. Deleted templates can't be recovered.
Copy link: Select Copy link to copy the template URL. For sharing options, see Create a work item from a template URL and Add a template link to a team dashboard.
Create copy: Select Create copy, enter a name, optionally adjust fields, and then select Save.
Verify the template list reflects your action (updated values, renamed item, copied template, or removed template).
Verify that Copy link opens a new work item form with the expected template values.


Add a work item by using a template
Use the template link in a browser to create a work item with predefined values.
Get the template link. For more information, see Edit, delete, copy link, create copy.
Paste the template link into a browser, complete required fields, and save your changes.
Verify the new work item opens with template-defined values populated before you save.
Apply a template to new or existing work items
Apply a template to a new or existing work item, or use a template for bulk updates.
In the web portal, you can apply a template in an open work item or across selected work items.
Apply a template within a work item
Use these steps to apply a template to a new or existing work item:
Open a new or existing work item that you want to update with template-defined values.
Select
More actions > Templates, and then select the name of a predefined template:
Note
The Templates list shows templates defined for teams of which you're a member. If the list is empty, there might not be any templates for the work item type. Refresh your browser to discover the latest available templates.
Select Save to apply the template. Field changes are recorded in the work item History field.
Verify the fields update in the form and the work item History records the saved changes.
Apply a template to several work items
Use these steps to apply a template to selected work items for a bulk update:
Select work items from the Backlog or a Queries results list. All selected items must be the same work item type, such as Bug or Feature.
Select
More actions > Templates for one of the selected work items, and select the template to apply.
The field changes are applied and saved automatically. Field changes are recorded in the work item History field. For more information about bulk updates, see Bulk modify work items.
Verify each selected work item shows updated field values and corresponding History entries.


Add or remove tags from templates
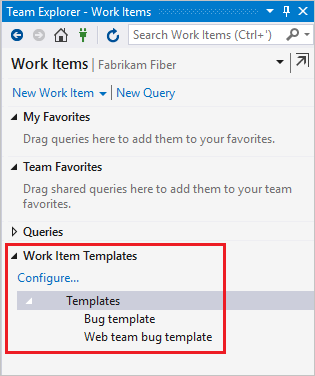
In Visual Studio 2015 or earlier versions, you can add tags to a template. When you use the template, the tags automatically apply to the work item. To add two or more tags, separate them with a comma (,). You can't add tags in the web portal.

If you don't specify tags to remove, all tags in a work item stay defined. The tags stay defined even when you apply a work item template to an existing work item.
Verify in Visual Studio that the template retains the configured tags and applied work items include those tags after you save.
Create a work item from a template URL
Create a URL that opens a new work item with predefined field values. Use this approach when you want a shareable shortcut to a common work item configuration.
Use saved templates for reusable, team-managed defaults. Use template URLs when direct link sharing is the primary experience.
- Use saved templates when your team needs centrally managed defaults.
- Use template URLs when you need lightweight sharing in dashboards, wikis, or messages.
https://dev.azure.com/<Organization_Name>/<Project_Name>/_workItems/create/<Work_Item_Type>?
[FieldReferenceName 1]={FieldValue 1}&
[FieldReferenceName 2]={FieldValue 2}&
[FieldReferenceName 3]={FieldValue 3}&
. . .
http://<Server_Name>:8080/tfs/DefaultCollection/<Project_Name>/_workItems/create/<Work_Item_Type>?
[FieldReferenceName 1]={FieldValue 1}&
[FieldReferenceName 2]={FieldValue 2}&
[FieldReferenceName 3]={FieldValue 3}&
. . .
The following example creates a Task work item with a predefined Title, Assigned To, Description, Tags, Activity, and Iteration Path.
https://dev.azure.com/<Organization_Name>/<Project_Name>/_workItems/create/Task?
[System.Title]=TaskTitle&
[System.AssignedTo]=Jamal+Hartnett&
[System.Description]=<p>Always+include+Remaining+Work+and+links+to+any+related+bugs+or+user+stories.</p>&
[System.Tags]=Web;+Phone;+Service&
[Microsoft.VSTS.Common.Activity]=Development&
[System.IterationPath]=Fabrikam+Fiber%5CIteration+1
http://<Server_Name>:8080/tfs/DefaultCollection/<Project_Name>/_workItems/create/Task?
[System.AssignedTo]=Jamal+Hartnett&
[System.Description]=<p>Always+include+Remaining+Work+and+links+to+any+related+bugs+or+user+stories.</p>&
[System.Tags]=Web;+Phone;+Service&
[Microsoft.VSTS.Common.Activity]=Development&
[System.IterationPath]=Fabrikam+Fiber%5CIteration+1
Note
Some browser clients impose a 2,000 character limit for field values.
You can save the URL as a text file, or add it as a hyperlink on a dashboard or webpage.
Verify opening the URL loads the correct work item type and shows predefined field values in the new work item form.
Add a template link to a team dashboard
Add template links to a Markdown widget on your team dashboard in the web portal. Each link opens a new work item with predefined template values.
The following example shows a Markdown widget with links to three templates:

For setup steps, see Add Markdown to a dashboard, Markdown widgets.
Troubleshoot template issues
- Templates menu doesn't appear: Verify that you have access to the project and that you're using the workflow supported by your client.
- Templates list is empty in the web portal: Confirm that templates exist for the selected work item type and that you're a member of the team that owns the templates. Refresh the browser to load the latest templates.
- Can't manage a team template: Verify that you're a member of the team that owns the template.
- Can't apply a template to several work items: Confirm that all selected work items are the same work item type.
- Visual Studio template options aren't available: Confirm that you're using the legacy Visual Studio 2015 workflow and that Microsoft Visual Studio Team Foundation Server 2015 Power Tools are installed.
- Template URL opens without expected values: Confirm that each field reference name is valid for the target work item type and that values are URL-encoded (for example, spaces as
+or%20). - Template URL fails to load: Confirm that the URL uses the correct organization, project, and work item type, and that you're signed in to an account with project access.
- Some fields from a template don't populate: Confirm that the fields still exist on the work item type and aren't restricted by process customization rules.