Note
Access to this page requires authorization. You can try signing in or changing directories.
Access to this page requires authorization. You can try changing directories.
In this tutorial, you create a Chaos Studio Workspace, configure it to target your Azure Database for PostgreSQL resources, and run a zone-down failover Scenario. At the end, you review the Scenario report to confirm which actions ran and their outcomes, then validate recovery using your own monitoring and application health checks.
Prerequisites
- An Azure subscription. If you don't have one, create a free account.
- An Azure Database for PostgreSQL Flexible Server instance with high availability enabled.
- A user-assigned managed identity with Contributor role on the resource group that contains your PostgreSQL instance.
Important
The resource group you target must contain only HA-enabled PostgreSQL instances. Remove any read replicas from the resource group before you run this Scenario. Non-HA instances and read replicas cause the failover action to fail.
Create a Workspace
In the Azure portal, search for Chaos Studio and select it.

Select Create new workspace.

On the Basics tab, fill in your Subscription, Resource group, Workspace name, and Region. The Workspace can operate on resources in any region, so choose any supported region. Select Next: Scope.


Configure scope
For Scope type, select Subscription or Resource group. This scope type is recommended for PostgreSQL failover Scenarios because it discovers all HA instances in the resource group automatically.
Select your subscription and resource group, then select Apply.


Configure permissions
For Managed identity, select User assigned. A user-assigned identity is recommended for PostgreSQL failover Scenarios because it persists independently of the Workspace.
Grant the required permissions to the identity. You need at least Reader or Contributor access on the managed identity to add it here.
Select Add to assign the identity.


Review and create
Select Review + Create.
Review your configuration, then select Create.


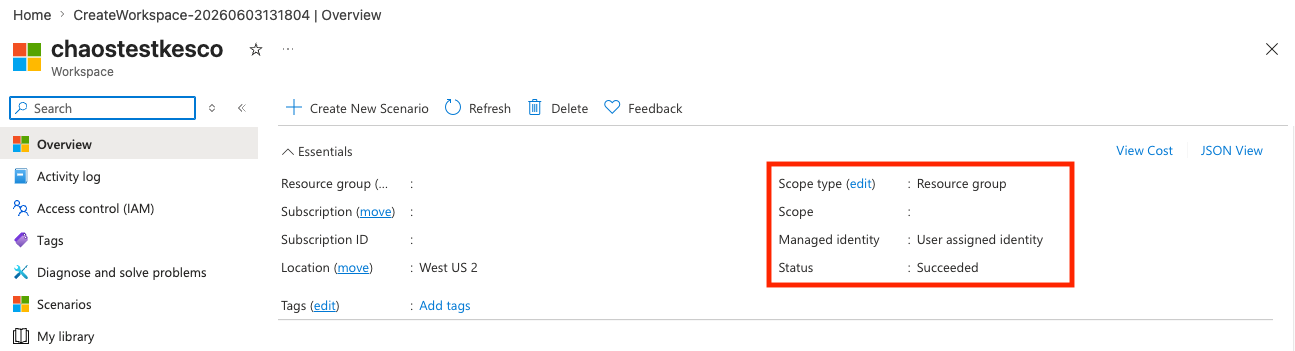
Verify the Workspace
After deployment completes, navigate to the Workspace's Overview page.
Confirm the Scope shows your resource group and the Managed identity is assigned.

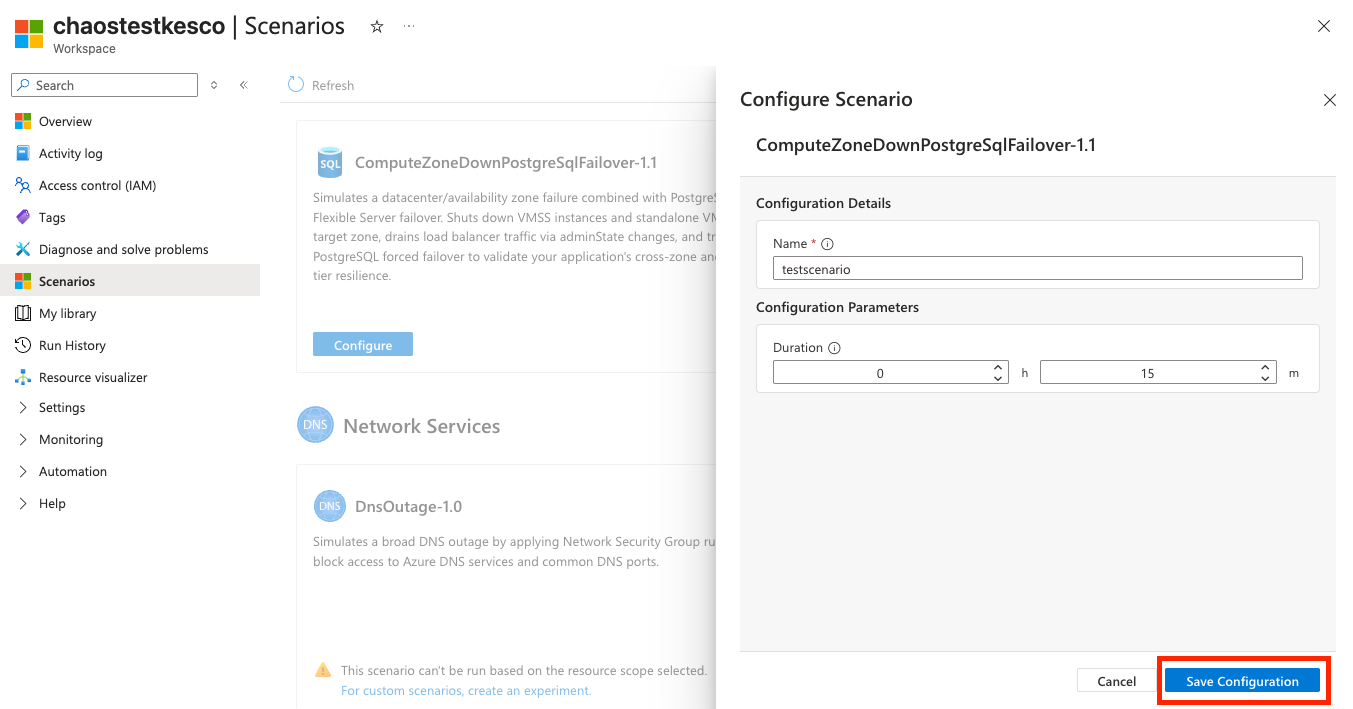
Browse and configure a Scenario
Select the Scenarios tab. Chaos Studio discovers the resources in your scope and recommends applicable Scenarios.
Find the Compute Zone Down + PostgreSQL Failover Scenario and select Configure.

Enter a Name and Duration for the failover test, then select Save Configuration.


Run the Scenario
Select the My Library tab to view your saved Scenarios.
Select Run on the PostgreSQL failover Scenario.

Important
After you select Run, wait for the Scenario run page to appear. You might need to refresh the portal. Don't select Run again — the Scenario is already queued and a duplicate run could affect your resources.
Monitor the run progress on the Scenario run page.


Review the Scenario report
When the Scenario status shows Succeeded, select Generate report.

Review the report to see which actions ran, their durations, and whether each action succeeded.

For more information about what each section of the report means, see Scenario reports.


Clean up resources
If you created the Workspace only for this tutorial, delete it by navigating to the Workspace resource and selecting Delete. Deleting the Workspace doesn't affect your PostgreSQL instances.